Android XML Design Review
This article will review different layouts and widgets like Buttons, Toggle-Buttons, Spinners, Clock, RadioGroup and its RadioButtons, Checkboxes, CardView, Switch, Chip, Form building, Time Picker, Date Picker, etc.
Layouts
There are many layouts where you can add components to it. They are:
Relative Layout
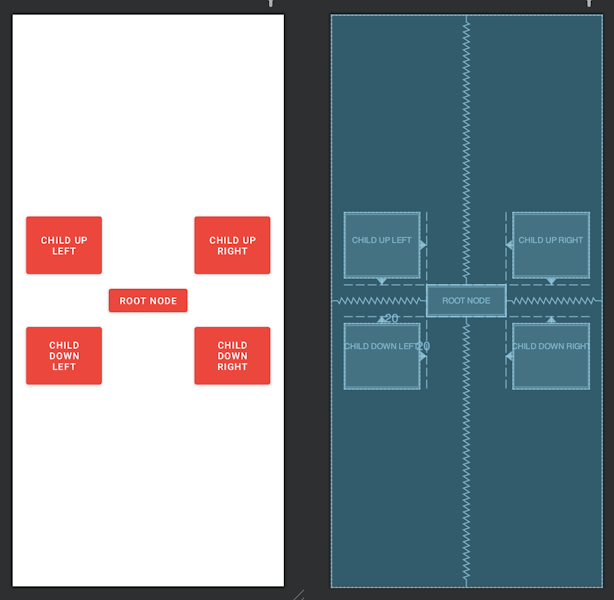
The Android Relative Layout is a type of layout manager in Android that allows you to position views relative to each other or the parent container. It enables you to define the position of child views based on their relationship to other views, such as aligning them to the left, right, top, bottom, or center and specifying their margin.
<?xml version="1.0" encoding="utf-8"?>
<RelativeLayout xmlns:android="http://schemas.android.com/apk/res/android"
    android:layout_width="match_parent"
    android:layout_height="match_parent">

    <Button
        android:layout_width="wrap_content"
        android:layout_height="wrap_content"
        android:text="I'm the parent"
        android:id="@+id/mainBtn"
        android:gravity="center"
        android:layout_margin="10dp"
        android:layout_centerHorizontal="true"
        android:layout_centerVertical="true"
    />

    <Button
        android:layout_width="wrap_content"
        android:layout_height="wrap_content"
        android:text="Baccha Down Left"
        android:layout_marginLeft="20dp"
        android:id="@+id/leftMainBtn"
        android:gravity="center"
        android:layout_toLeftOf="@+id/mainBtn"
        android:layout_below="@+id/mainBtn"/>

    <Button
        android:layout_width="wrap_content"
        android:layout_height="wrap_content"
        android:text="Baccha Down Right"
        android:layout_marginRight="20dp"
        android:id="@+id/RightMainBtn"
        android:gravity="center"
        android:layout_toRightOf="@+id/mainBtn"
        android:layout_below="@+id/mainBtn"/>

    <Button
        android:layout_width="wrap_content"
        android:layout_height="wrap_content"
        android:text="Baccha Up Left"
        android:layout_marginLeft="20dp"
        android:id="@+id/leftMainBtn1"
        android:gravity="center"
        android:layout_toLeftOf="@+id/mainBtn"
        android:layout_above="@+id/mainBtn"/>

    <Button
        android:layout_width="wrap_content"
        android:layout_height="wrap_content"
        android:text="Baccha Up Right"
        android:layout_marginRight="20dp"
        android:id="@+id/RightMainBtn1"
        android:gravity="center"
        android:layout_toRightOf="@+id/mainBtn"
        android:layout_above="@+id/mainBtn"/>

</RelativeLayout>
Here are some common use cases:
User Interfaces with Flexible Positioning: You can position views relative to each other, making it easier to adapt to different screen sizes or orientations.
Form-Based Screens: Relative Layout is well-suited for forms or input screens where you need to align labels and input fields in a specific manner.
Custom List Items: If you are creating a custom listview or a recycler view, Relative Layout can define the layout of individual list items.
Toolbars and Action Bars: You can position the title, action buttons, and other components relative to each other, allowing you to create a consistent and organized layout for your app's navigation and actions.
Overlapping Views: Relative Layout enables you to create views that overlap each other, which can be useful for creating effects like pop-up windows, tooltips, or overlay screens.
Linear Layout
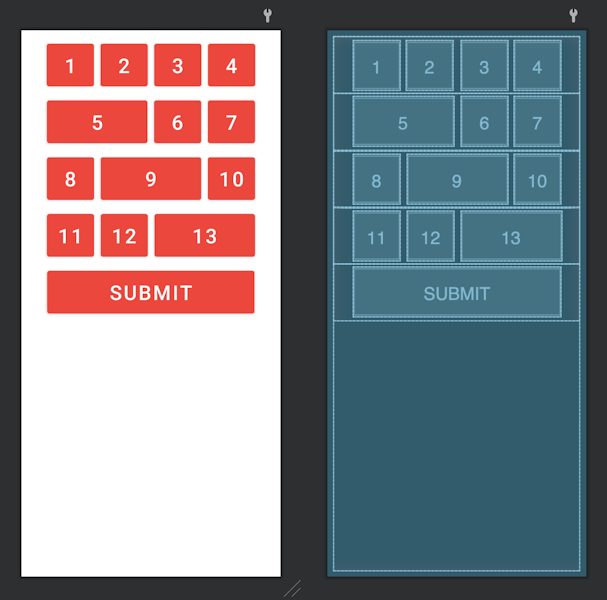
The Linear Layout is a type of layout manager in Android that arranges child views in a single direction, either horizontally or vertically. It provides a straightforward and flexible way to create user interfaces by linearly aligning views one after another.
<?xml version="1.0" encoding="utf-8"?>
<LinearLayout xmlns:android="http://schemas.android.com/apk/res/android"
    android:orientation="vertical"
    android:layout_width="match_parent"
    android:layout_margin="10dp"
    android:layout_height="match_parent">


    <LinearLayout android:orientation="horizontal"
        android:layout_width="match_parent"
        android:gravity="center"
        android:layout_height="wrap_content">

        <Button
            android:layout_width="75dp"
            android:textSize="32sp"
            android:layout_height="80dp"
            android:layout_margin="5dp"
            android:text="1"/>

        <Button
            android:layout_width="75dp"
            android:layout_height="80dp"
            android:textSize="32sp"
            android:layout_margin="5dp"
            android:text="2"/>

        <Button
            android:layout_width="75dp"
            android:layout_height="80dp"
            android:textSize="32sp"
            android:layout_margin="5dp"
            android:text="3"/>

        <Button
            android:layout_width="75dp"
            android:layout_height="80dp"
            android:textSize="32sp"
            android:layout_margin="5dp"
            android:text="4"/>

    </LinearLayout>


    <LinearLayout android:orientation="horizontal"
        android:layout_width="match_parent"
        android:gravity="center"
        android:layout_height="wrap_content">

        <Button
            android:layout_width="160dp"
            android:layout_height="80dp"
            android:textSize="32sp"
            android:layout_margin="5dp"
            android:text="5"/>

        <Button
            android:layout_width="75dp"
            android:layout_height="80dp"
            android:textSize="32sp"
            android:layout_margin="5dp"
            android:text="6"/>

        <Button
            android:layout_width="75dp"
            android:layout_height="80dp"
            android:layout_margin="5dp"
            android:textSize="32sp"
            android:text="7"/>


    </LinearLayout>


    <LinearLayout android:orientation="horizontal"
        android:layout_width="match_parent"
        android:gravity="center"
        android:layout_height="wrap_content">

        <Button
            android:layout_width="75dp"
            android:layout_height="80dp"
            android:textSize="32sp"
            android:layout_margin="5dp"
            android:text="8"/>

        <Button
            android:layout_width="160dp"
            android:layout_height="80dp"
            android:textSize="32sp"
            android:layout_margin="5dp"
            android:text="9"/>

        <Button
            android:layout_width="75dp"
            android:layout_height="80dp"
            android:layout_margin="5dp"
            android:textSize="32sp"
            android:text="10"/>


    </LinearLayout>


    <LinearLayout android:orientation="horizontal"
        android:layout_width="match_parent"
        android:gravity="center"
        android:layout_height="wrap_content">

        <Button
            android:layout_width="75dp"
            android:layout_height="80dp"
            android:textSize="32sp"
            android:layout_margin="5dp"
            android:text="11"/>

        <Button
            android:layout_width="75dp"
            android:layout_height="80dp"
            android:textSize="32sp"
            android:layout_margin="5dp"
            android:text="12"/>

        <Button
            android:layout_width="160dp"
            android:layout_height="80dp"
            android:layout_margin="5dp"
            android:textSize="32sp"
            android:text="13"/>


    </LinearLayout>


    <LinearLayout android:orientation="horizontal"
        android:layout_width="match_parent"
        android:gravity="center"
        android:layout_height="wrap_content">


        <Button
            android:layout_width="330dp"
            android:layout_height="80dp"
            android:layout_margin="5dp"
            android:textSize="32sp"
            android:text="SUBMIT"/>


    </LinearLayout>
</LinearLayout>
Here are some use cases of Linear Layout:
Lists and RecyclerView Items: Linear Layout is commonly used to create lists or RecyclerView items in Android applications.
Forms and Input Screens: Linear Layout is useful for creating forms or input screens where you must organize various input fields, labels, or buttons in a linear order.
Chat Bubbles: You can achieve a linear representation of messages in a conversation by aligning views horizontally or vertically within each chat bubble.
Navigation Bars: Linear Layout can create navigation bars at the bottom or top of the screen. By arranging icons or buttons horizontally within the linear layout, you can provide easy navigation options for users.
Sliders and Seek Bars: Linear Layout is suitable for creating sliders or seek bars that allow users to select a value within a range.
Media Players: Linear Layout can create media player controls, such as play/pause buttons, progress bars, and volume controls.