Flutter State Management with GetX and many more...
Github link: https://github.com/anwholesquare/flutter_get_x
In this article, we will learn about Flutter state management with getX which is a powerful state management library for building applications using the Flutter framework. It offers a simple and intuitive way to manage the state of your application, making it easier to develop and maintain complex UIs. Except for handling states within the app, here are some of the key functionalities and features that GetX offers:
Dependency injection
Route management
Dialog and snackbar
Multi-language support
Animation management
Worker management
Let's create a flutter boilerplate using this command:
flutter create --org com.yourcompanyname -i swift -a kotlin appname
Now we need to install two GetX components by adding these lines in
pubspec.yaml
dependencies:
  flutter:
    sdk: flutter
  #add these lines
  get: ^4.6.1
  get_storage: ^2.0.3
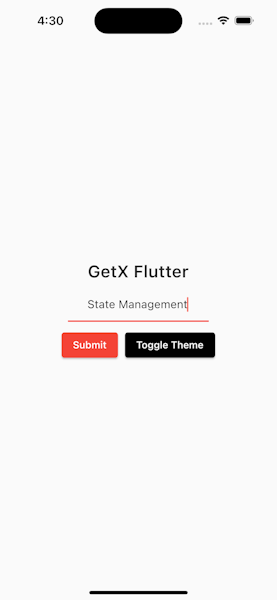
Let's make an app where we can change a text based on TextField input and toggle the app theme by ElavatedButton.
To do this, we need two GetXControllers where we will initialize our observable variables and functions that can update the widget. They are AppController and ThemeController.
AppController.dart
import 'package:get/get.dart';

class AppController extends GetxController {
  var appName = "GetX Flutter".obs;

  void setAppName (String _appName) {
    appName.value = _appName;
  }
}
Using this AppController class which extends GetxController, we will observe the value of the app name.
ThemeController.dart
import 'package:get/get.dart';
import 'package:get_storage/get_storage.dart';
import 'package:flutter/material.dart';

class ThemeController extends GetxController {
    final _box = GetStorage();
    final themeModeKey = "isDarkMode";
    bool _loadTheme() => _box.read(themeModeKey) ?? false;

    ThemeData darkTheme = ThemeData(
      primarySwatch: Colors.red,
      brightness: Brightness.dark
    );

    ThemeData lightTheme = ThemeData(
      primarySwatch: Colors.red,
      brightness: Brightness.light
    );

    ThemeData get theme => _loadTheme() ? darkTheme : lightTheme;

    void toggleTheme () {
      _box.write(themeModeKey, !_loadTheme());
      Get.changeTheme(theme);
    }
}
In ThemeController.dart, we use GetStorage Library to persist the theme each time running the app on the mobile. By default, the theme will get the value of light theme as no data can be loaded as a theme from the _box or GetStorage. toggleTheme() is used to toggle the theme and save it in the _box.
main.dart
import 'package:flutter/material.dart';
import 'package:flutter_get_x/Controller/AppController.dart';
import 'package:flutter_get_x/Controller/ThemeController.dart';
import 'package:flutter_get_x/HomePage.dart';
import 'package:get/get.dart';

void main() async {
  await GetStorage.init();
  runApp(MyApp());
}

class MyApp extends StatelessWidget {

  final AppController appController = Get.put(AppController());
  final ThemeController themeController = Get.put(ThemeController());
  MyApp({super.key});

  @override
  Widget build(BuildContext context) {
    return GetMaterialApp(
      home: HomePage(),
      debugShowCheckedModeBanner: false,
      theme: themeController.theme,
    );
  }
}
Here we use GetMaterialApp as the root of widget tree which is similar to MaterialApp and we put the controller using Get.put() method to find those two controllers by Get.find<ControllerName>() method within the child widgets of the tree. Inside main() async, await GetStorage.init(); this line is important to initialize the GetStorage();
Now lastly add the HomePage class to render the initial widget of MaterialApp.
HomePage.dart
import 'package:flutter/material.dart';
import 'package:flutter_get_x/Controller/AppController.dart';
import 'package:flutter_get_x/Controller/ThemeController.dart';
import 'package:get/get.dart';

class HomePage extends StatelessWidget {
  final AppController appController = Get.find<AppController>();
  final ThemeController themeController = Get.find<ThemeController>();
  TextEditingController appNameController = TextEditingController();
  HomePage({super.key});

  @override
  Widget build(BuildContext context) {
    return Scaffold(
      body: SafeArea(
        child: Obx( () =>
           Center(child: Column(
            mainAxisAlignment: MainAxisAlignment.center,
            children: [
              Padding(
                padding: const EdgeInsets.all(8.0),
                child: Text(appController.appName.value, style: const TextStyle(fontSize: 24, fontWeight: FontWeight.w600),),
              ),
              SizedBox(
                width: 200,
                child: TextField(
                  controller: appNameController,
                  textAlign: TextAlign.center,
                  decoration: const InputDecoration(hintText: "Write App Name",),
                )
              ),
              const SizedBox(height: 10,),
              Row(
                mainAxisAlignment: MainAxisAlignment.center,
                children: [
                  ElevatedButton(onPressed: ()=>
                    appController.setAppName(appNameController.text)
                  , child: const Text("Submit")),
                  const SizedBox(width: 10,),
                  ElevatedButton(onPressed: ()=>
                    themeController.toggleTheme()
                  ,
                  style: ElevatedButton.styleFrom(backgroundColor: Colors.black), child: const Text("Toggle Theme"),
                  ),
                ],
              )
            ],
           ))
        )
      ),
    );
  }
}
In the HomePage class, We use Obx( () => WidgetClass() ) to render the widget frequently when an update is available by the controller classes' observable variables.
Now this app looks like this.
In summary, we need to make a controller to observe variables (adding .obx at the end of the value) that update the widgets inside the Obx widget. And GetStorage() can read and write the data for persistence. All of these works have been done in this GitHub repository.
Checkout till this point: git checkout d6b63d2036b6c6fa178f114a3ca5ed5b198e94dc
Now your task is to add a few features to the app using GetX and GetStorage:
Login system based on email and password,
Change password page
Logout option
To do this task, there are a few more things to learn.
  Get.to( () => NewPage() );
  // this code is used to go to the new Page
  // and leave the current page in a stack.
Get.off(() => NewPage()); // this code is used to go to the new Page // and remove the current page from the stack.Get.offAll( () => NewPage()); // this code is used to go to the new Page // and clear the stack// add this importation for the persistance import 'package:get_storage/get_storage.dart'; void main() async{ // to work after restarting the app, we need to add this line await GetStorage.init(); runApp(MyApp()); } // to write to the storage via key-value pair GetStorage().write("email", "khandokerxyz@gmail.com"); // to read from the storage via key GetStorage().read("email");To use GetX SnackBar, you can use this snippet:
Get.snackbar("Flutter with GetX", "Logging out from the device", snackPosition: SnackPosition.BOTTOM);If you're stuck on this task, you can see how it has been done:
  git clone https://github.com/anwholesquare/flutter_get_x.git
  git checkout 0f42abc84d33f2268c9e58eb282d2daad8b2ff7e
The outcome of the task may seem like this video: